
A Conda Cheat Sheet
Imagine you find an older project that depends on an older version of Pyhton 2.7, but many of your other tools depend on Python 3.6. Here, environments are one solution to the problem. You can create multiple projects with different dependencies in isolated environments. This is one reason you use Conda. Other reasons include the following:
- With Conda you can install packages on a host on which you do not have admin privileges.
- Conda provides prebuilt packages, avoiding the need to deal with compilers or trying to work out how exactly to set up a specific tool.
Although Conda was created for Python programs, Conda can package and distribute software for any language such as R, Ruby, Lua, Scala, Java, JavaScript, C, C++, FORTRAN.
Conda, Miniconda, and Anaconda
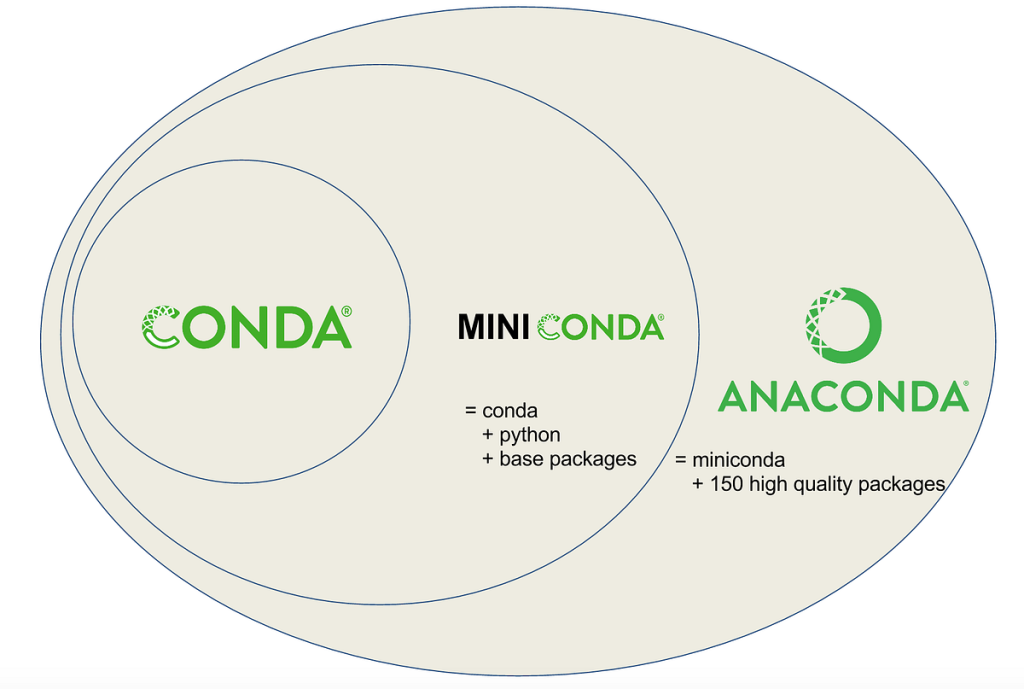
The diagram above shows the difference between them:
- Conda is a tool for managing environments and installing packages.
- Miniconda combines Conda with Python and a small number of core packages.
- Anaconda includes Miniconda as well as a large number of the most widely used Python packages.
Installing Conda
If you still have any Conda installed in your system, first you need to install it. For Conda installation, you can follow its documentation here: https://docs.conda.io/projects/conda/en/stable/index.html
Check if Conda and Python exist
To check if Conda is installed in your computer and where it is installed:
$ where condaTo check if Python is installed in your computer and where it is installled:
$ where pythonThis will return where Python is installed in your computer, regardless of whether it is in your host or inside Conda.
To check which Conda version is installed:
$ conda ‐‐versionConda Environment
Conda has a default environment called “base” that include a Python installation and some core system libraries and dependencies of Conda. It is a “best practice” to avoid installing additional packages into “base” encironment. Additional packages needed for a new project should always be installed into a newly created Conda environment.
To activate and deactivate the “base” environment:
$ conda activate
$ conda deactivate
The commands above will bring you to the “base” environment prompt and return to the host prompt, respectively. Since in general you will not build in the “base” environment, you may only need these commands to check if Conda is installed well after installing Conda.
To create a new environment for Python development using Conda, use “conda create –name” followed by your environment name and the package(s) you want to install in your environment. If you want, you can also specify the version of package(s) you want to install. For example:
$ conda create ‐‐name python3‐env python
$ conda create ‐‐name python3‐env python=3.6
$ conda create ‐‐name basic‐scipy‐env ipython=7.13 matplotlib=3.1 numpy=1.18 scipy=1.4
Another example, if you want to create a new environment called “machine-learning-env” with Python and the most current versions of IPython, Matplotlib, Pandas, Numba and Scikit-Learn:
$ conda create ‐‐name machine‐learning‐env \
ipython \
matplotlib \
pandas \
python \
scikit‐learn \
numba
By default, your Conda environments stay in /envs folder inside your Conda workspace.
To activate a Conda environment, use “conda activate” followed by the environment name. For example:
$ conda activate machine-learning‐envThat command will bring you to the environment prompt:
(machine-learning-env) $To deactivate a Conda environment, use “conda deactivate” followed by the environment name. For example:
(machine-learning‐env) $ conda deactivateIt will bring you to the host prompt:
$To check all the existing Conda environments:
$ conda env listTo delete an existing environment, use “conda remove”. For example:
$ conda remove ‐‐name machine-learning‐env ‐‐allInstalling a package into an existing environment
Use “conda install”. For example, if you want to install Dask into “machine-learning-env” environment:
If you are already inside the environment:
$ conda activate machine-learning‐env
(machine-learning‐env) $ conda install dask
If you are still on the host:
$ conda install ‐‐name machine-learning‐env daskTo check what packages installed in your Conda environment:
$ conda list ‐‐name machine‐learning‐envCreating a Conda definition file and sharing an environment
If you want to clone an existing environment, you can use a Conda definition file, written as YAML file. First, you need to create a YAML file of the environment. One way to create it is by exporting it from an existing environment. For example:
conda env export ‐‐name machine‐learning‐env ‐‐from‐history ‐‐file
environment.yml
This will create a file named environment.yml that looks like this:
name: machine‐learning‐env
channels:
  ‐ defaults
dependencies:
  ‐ scikit‐learn
  ‐ python
  ‐ pandas
  ‐ numba
  ‐ ipython
  ‐ matplotlib
  ‐ dask
  ‐ pip
  ‐ pip:
    ‐ combo==0.1.3
    ‐ patsy==0.5.2
    ‐ pyod==1.0.2
    ‐ statsmodels==0.13.2
This YAML file uses indentation to indicate nesting, just like in Python.
Similar YAML file can also created manually by opening a text editor like gedit, writing the content of the YAML file, and finallly naming it “environment.yml”.
To copy the environment, you can create a similar Conda environment and reuse the created environment YAML file:
conda env create ‐‐name machine‐learning‐env ‐‐file environment.ymlIn other words, “conda env create” is a command to create an environment based on an environment definition file.